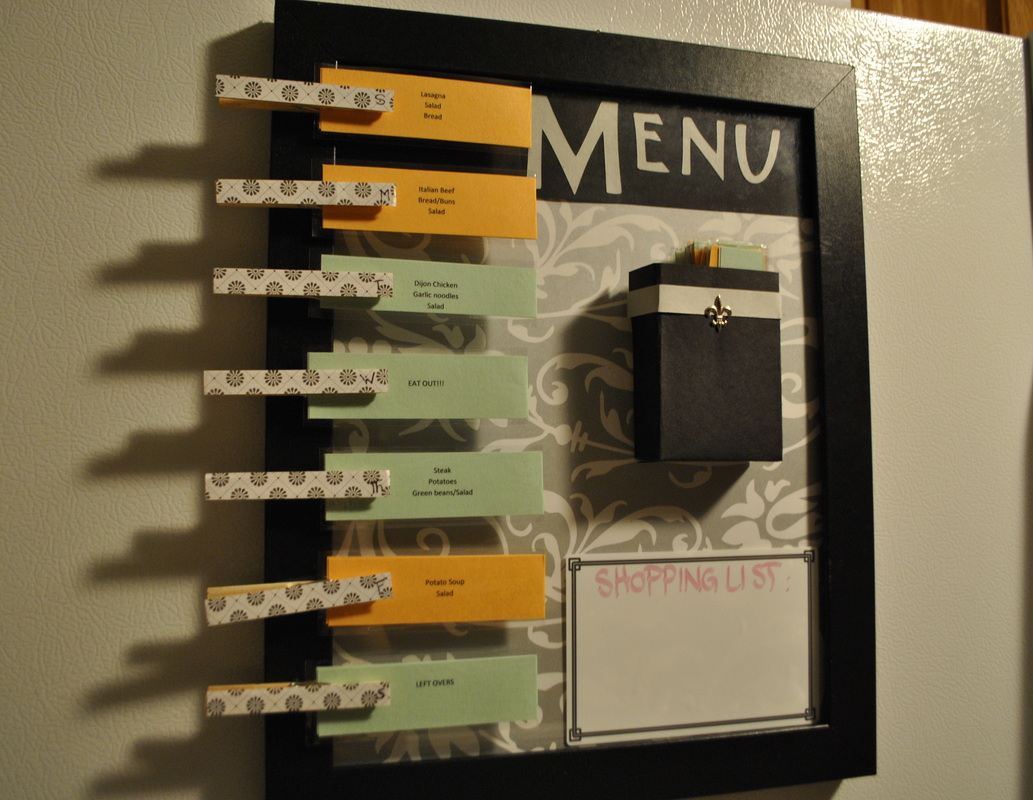
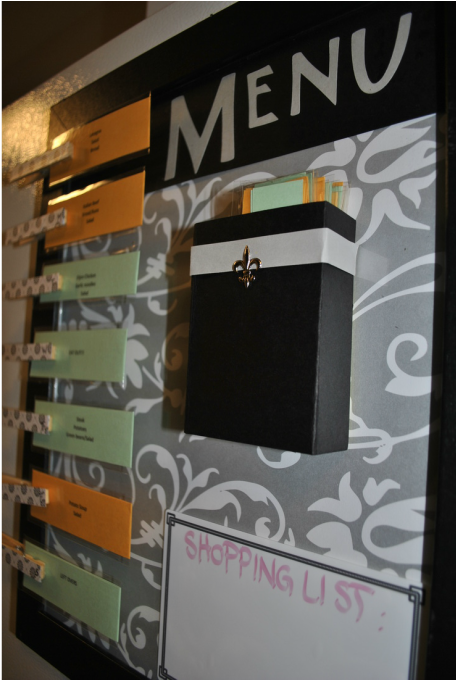
So, shame, shame on me!!! It has been over 4 months since I was on here last. I am so embarassed! But, I have been very crazy, buzy working on pinning items to inspire me to decorate our NEW HOME!!! (ok, so, it's an apartment, but to us, its a HOME!). So, one of the items I wanted to start with was a menu board. I was incredibly inspired by a pin circulating around Pinterest and decided I would add a new spin to it! The original idea came from Once Upon a Chocolate Chip Pancake and I decided this was something that I COULD DO!
Some of the things I LOVED about this concept:
- it is made to be adjusted weekly, so it forces us to sit down and plan what we want to have for the upcoming week
- each card has the complete meal listed on the front and the back contains all the ingredients needed for the said recipe
- the box holds the remaining recipe items, so that we can continue to have a cycle of seemingless-ly unending meal plans
What I adjusted about OUR Menu board:
- I added a dry erase sticker so that we can add the items that we may not have in our pantry to the list as we prepare our weekly meal
- I took the concept of hanging the frame on the wall, and added Command strips with velcro so that we can easily take the menu board on or off the fridge to adjust/add/modify
- I added a few meal cards that suited our "lifestyle" to include "Cocktail nights" for Fridays and "write ins" for recipes that we find to easily add into the arsenal
- the original plan included using self laminating sheets, but I chose to go a different (and rather cost effective) route, using clear packing tape
What You Will Need:
- 11x14 frame
- scrapbook paper
- printer paper ( I chose 2 different colors)
- Avery dry erase sticker
- 7 clothespins
- packing tape
- Sharpie pen
- modge podge (I currently use pre-mixed podge)
- one 16-count crayon box to be used for the meal card container
- hot glue gun
Menu Board Background: I took the 11x14 frame, and determined the scrapbook background paper I preferred and trimmed it up to the desired size. I wanted some contrast, so I used the black at the top as a top border. Using my handy-dandy-cricut machine, I cut the letters to create MENU in the contrasting color. I then pieced them together and paper glued them into place. 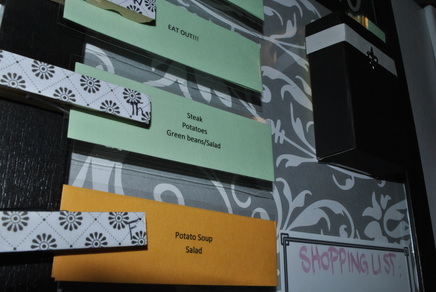 Menu Cards:
To create the menu cards, I started with a word document and formatted it into two columns. Then, hubby and I collaborated on approx 40 different entrees. From this, I added the side dishes (essentially each meal comes with - SALAD!). Then, from recipes I knew the ingredients for, I placed into the adjoining column all the food items needed to make said meal. For the meals we brainstormed about that I was unfamiliar with the complete ingredient list, I used PINTEREST and created an arsenal of word document recipes to suit our meal cards. So, when I was finished with the list, my finished product had the meal on the Left column and the ingredient list on the Right column. Printed them out, folded them in half, trimmed them up, and then used packing tape to "laminate" them so that each card now has a front and back. After "laminating" them, of course I had to re-trim them because I am no good at straight lines!!
Clothespins: I searched through more of my scrapbooking paper to find a pattern that I enjoyed to work with the background look. I then traced the size of the clothespins x7 on the paper and trimmed out the skinny rectangles. Using my modge podge, I modge-podged the paper strips onto the tops of the clothespins and had to let them sit overnight to dry properly. I am always so amazed at modge podge, because when it is first placed onto the object it has a "glue-y white" look to it, questioning your outcome. But when you let the item sit, it becomes clear and all the original aspects of the item you used (MAGIC)! To indiate the days on the clothespins, I did not do anything fancy. I just wrote the first letter using a fine tip Sharpie pen. Using the hot glue gun, I glued the pins onto the edge of the frame (evenly spaced, of course).
Card Holder: Using a 16-count crayon box, remove the top folds so that the container is without a lid. Then, I sized up the paper to match the crayon box so that it wraps completely around from all sides and on the bottom. Using my paper tape, I secured the paper to the crayon box, and then secured that to the glass of the frame. For decorative purposes, I added another border and a small Fleur-de-lis to excite me ;-)
Dry Erase Sticker: Well, this one is the MOST self-explanatory, but I wanted to achieve the concept of having a place to be able to create a shopping list for food items we would need to complete our week of meals. I found these wonderful Avery dry erase stickers that came in a 4 pack with different color borders. For ease, I stuck with the black and white theme and stuck that right on the frame glass. So, there it is!! Our new menu board!! I cannot wait to actually put it into use and get going!! For ease, I am willing to email the menu items as well as some of the recipes I created them from.
MEAL-ON!!!
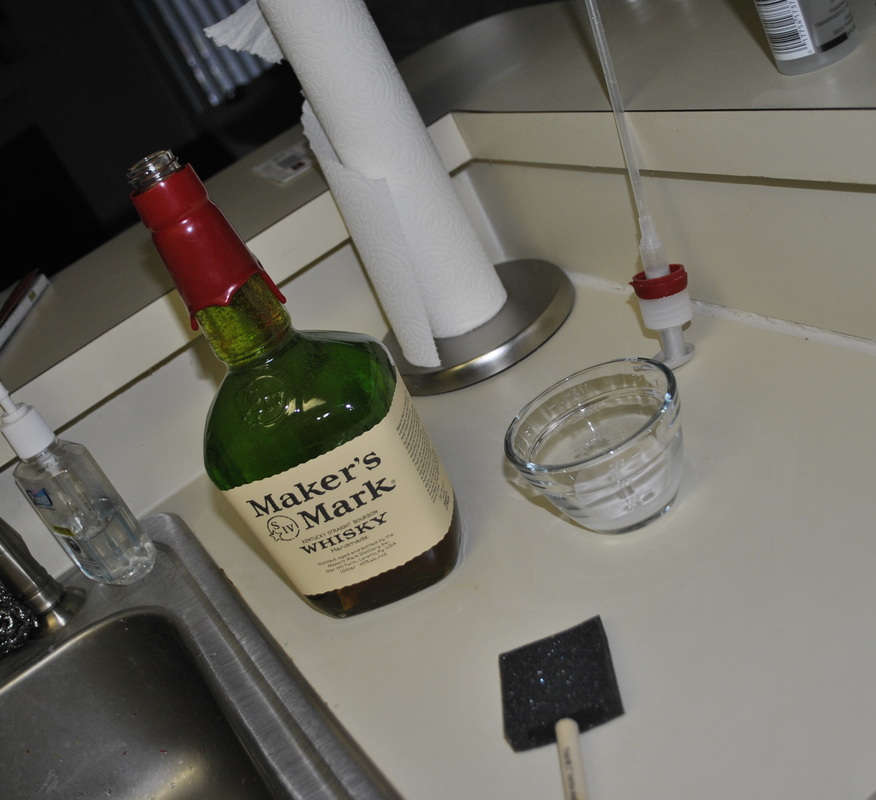
We've been using Maker's Mark while entertaining to create Whiskey Sours (they've been a big hit around here, but maybe not nearly as huge of a hit as my Amaretto Stone Sours!). So when we finished one bottle, I knew this was way to precious and priceless to throw away. Since living in Virginia Beach, it's fun to enjoy things from back home. How lucky are we that this means we get to induldge in: bourbon, horseracing, baseball bats, singing happy birthday...and I'll stop there. I don't want to sound like I'm bragging ;-)
So what were we talking about?? Oh yea, my new craft!!
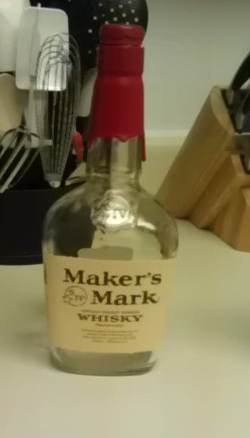 I turned THIS....
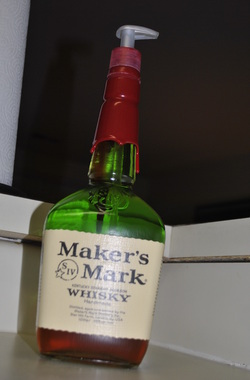 Into THIS!!!
I actually have to credit my brother for this inspiration. A few christmas' ago, he turned a bottle of Bailey's Irish Cream into a soap dispenser for the Bailey's Christmas gift exchange. Needless to say, it was a MAJOR hit!! Here I am, a few years later, and decided to finaly put the plan into action!
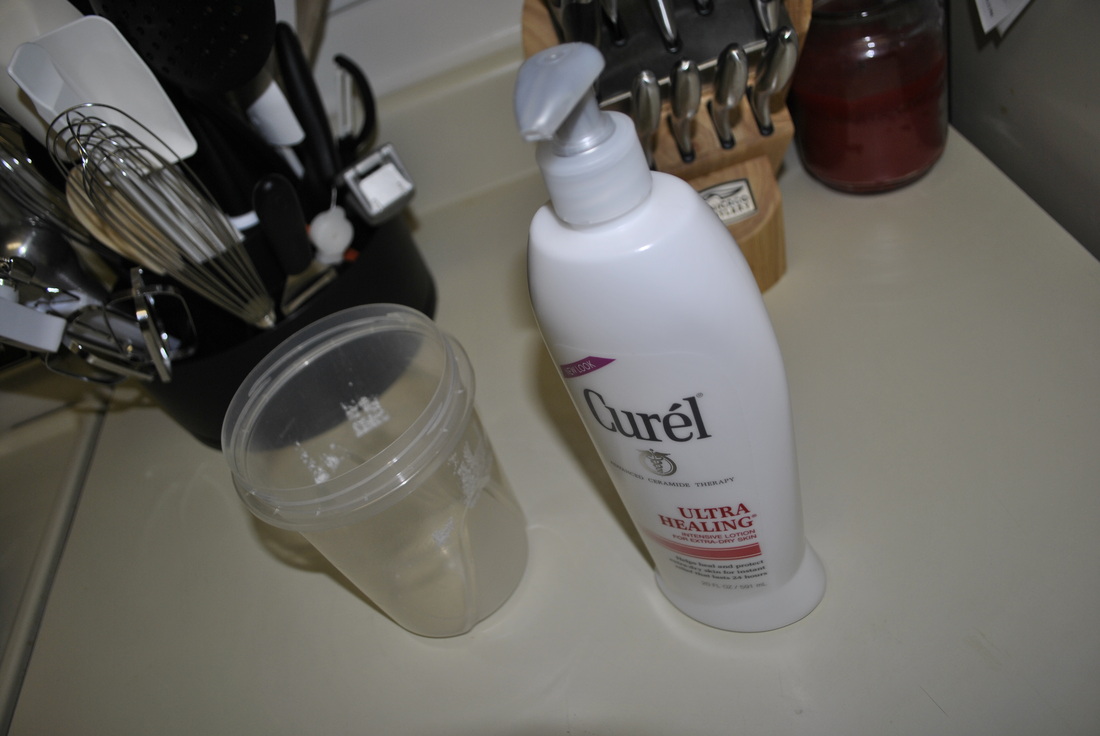
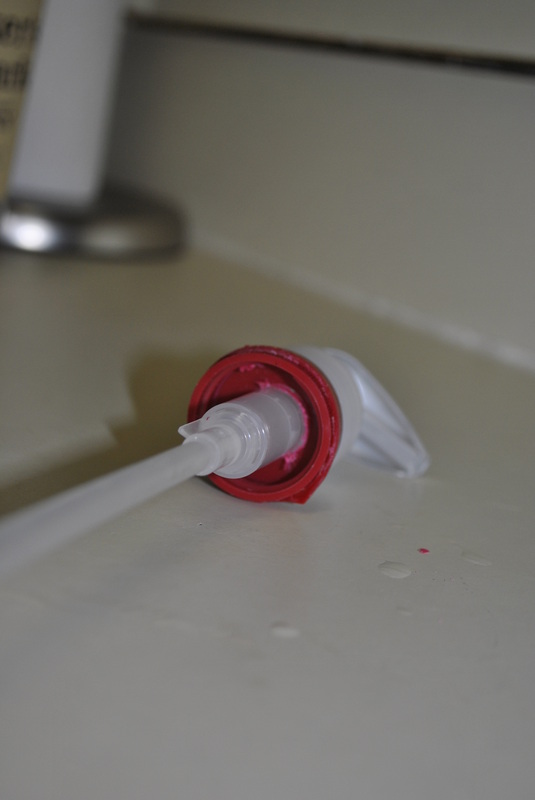
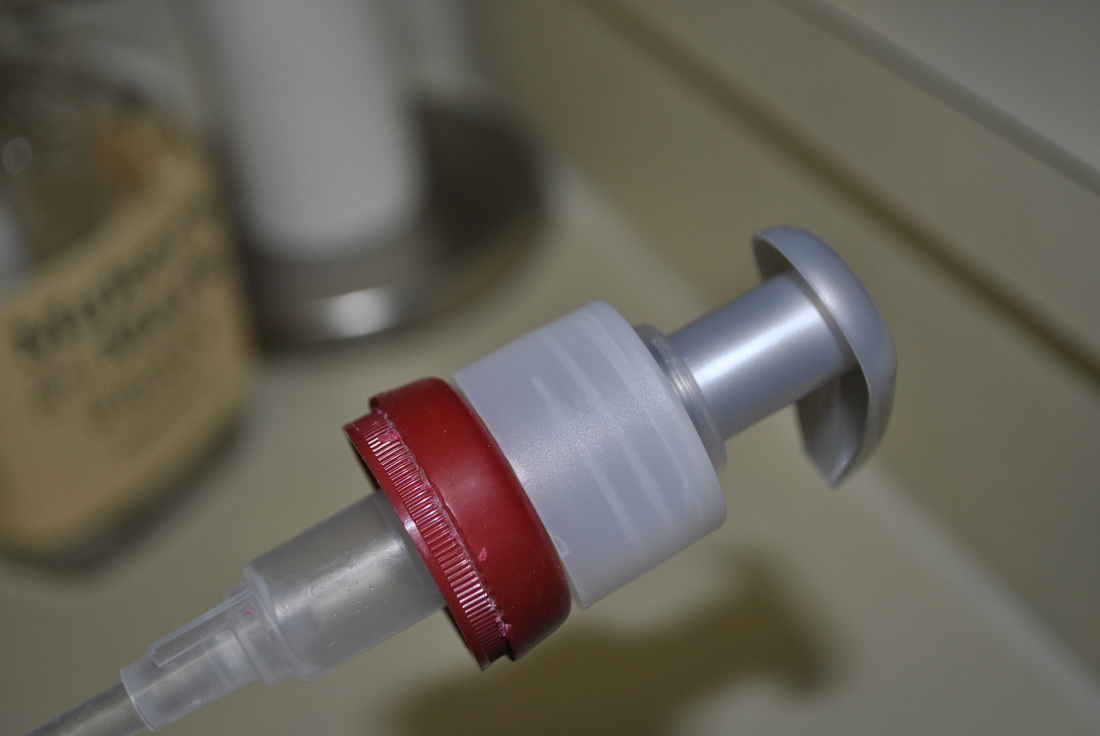
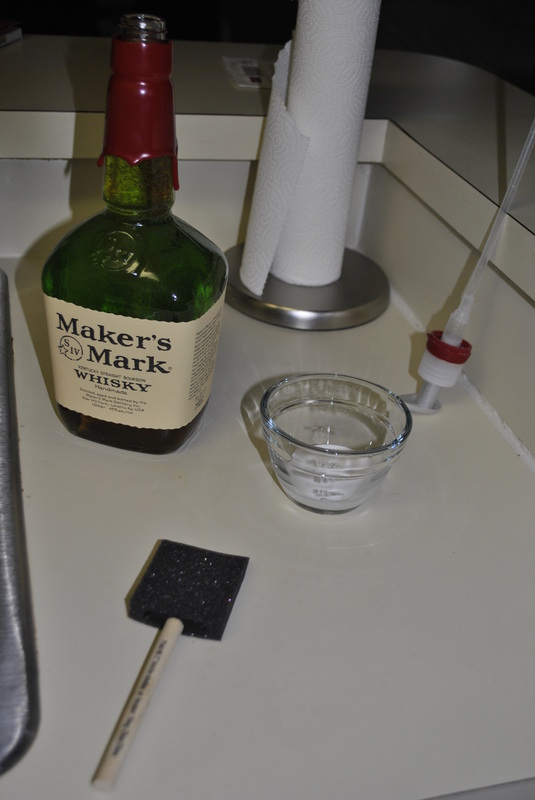
To start the process, you will need a bottle of your choice (mine just happened to be Maker's, but it can work essentially with any good bottle) and a pump to work with. This is where I struggled the most, because I did not have a lotion bottle with the desired look or neccessary length to use with this project. So I traveled out to good ol' Kmart and found a tall bottle of Curel. I chose this bottle for a few reasons. 1. It was very tall and 2. It had a silver pump (vs. others that were royal blue, etc and just would not work with what I wanted!!). When I got home, this is where I started!
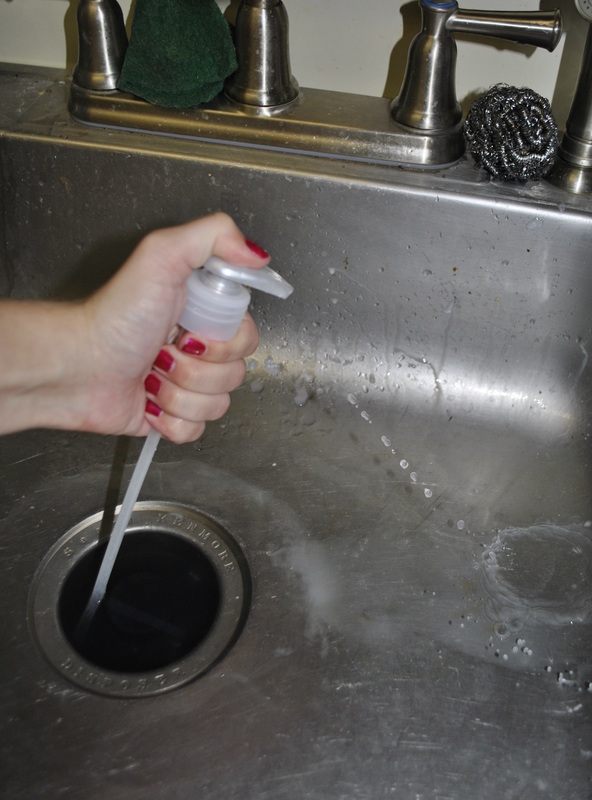
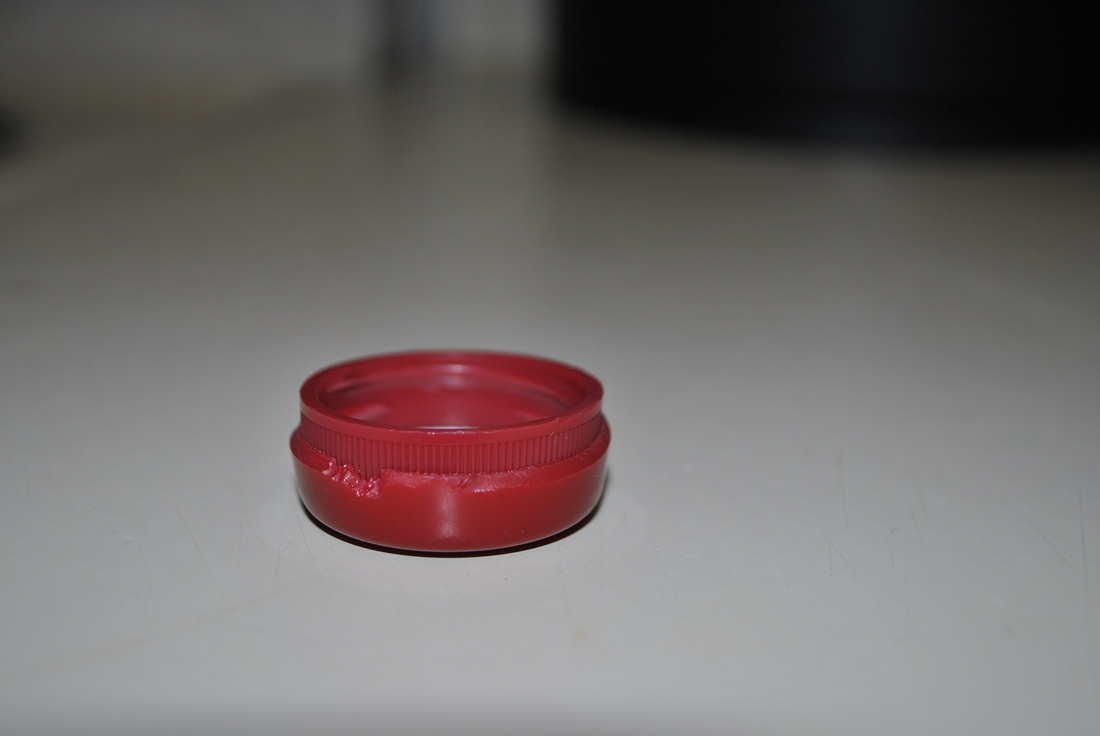
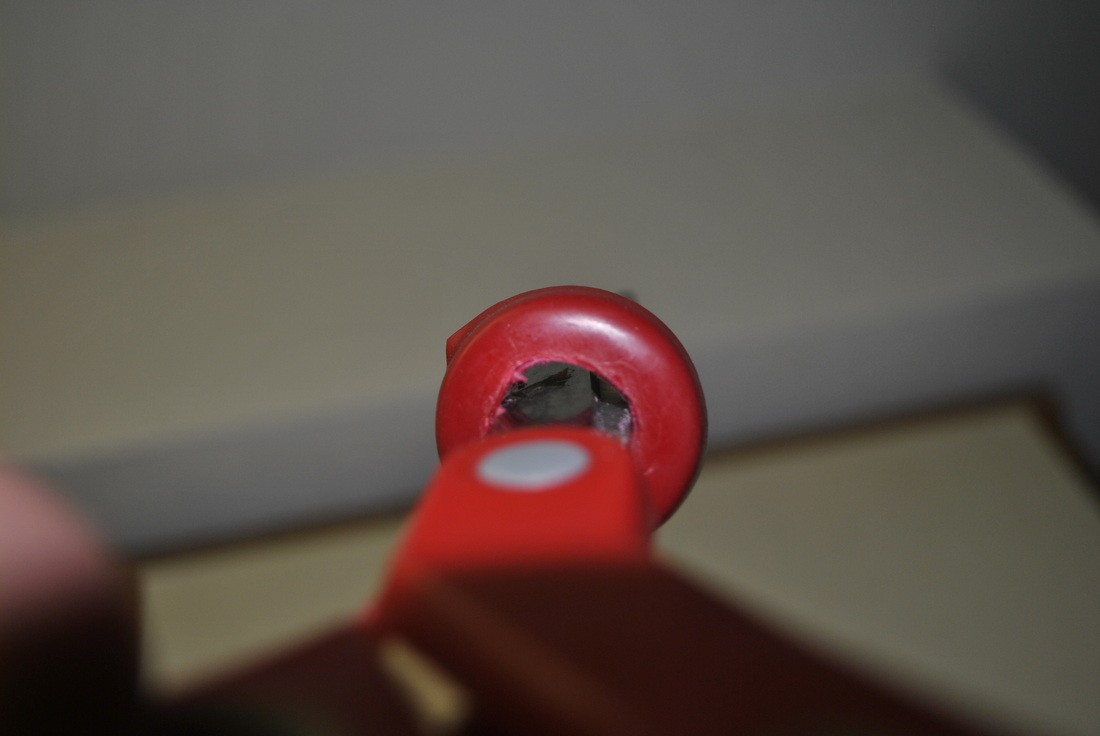
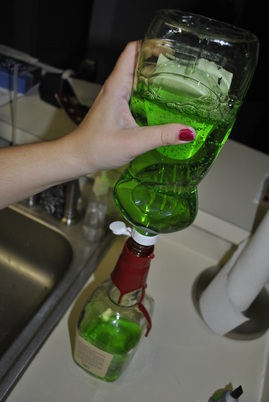
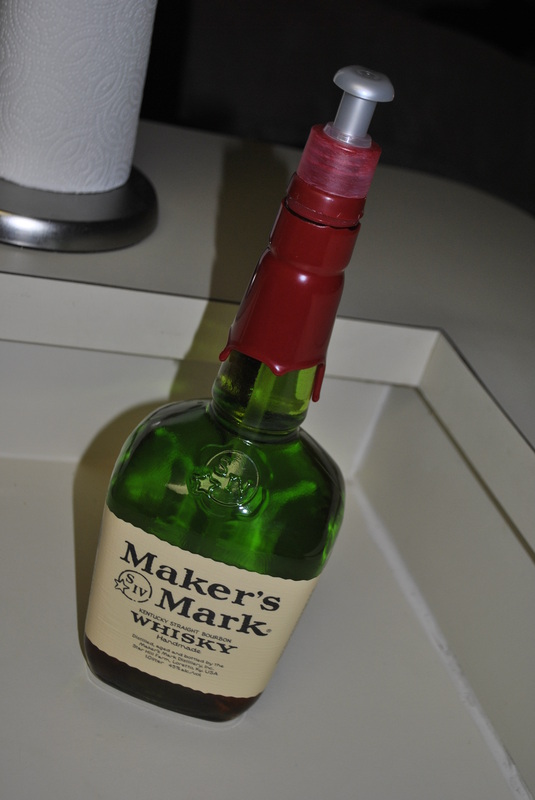
Since I needed to use the pump to the lotion, and I couldn't fathom just tossing the lotion, I emptied it into a ziploc container and it is now resting comfortably in our bathroom (in a very, unappealing fashion; but het, it works!). Then, since I did not want to mix lotion and dish detergent, I had to empty the pump and prime it for it's next purpose in life. I stopped up the kitchen sink and let water gather. I put the end of the tube in the water and pumped the dispenser until it began shooting primarily water vs lotion-y water. Now, the pump was primed for it's next role. But, there in lied another roadblock. How to get the pump onto the liquor bottle so that it is removable for reuse, but it sturdy enough not to spill detergent all over the counter. So I was a little flustered with the solution, and it required assistance from my brother. He said he drilled a hole into the top of the lid to the liquor bottle enough so the pump would fit. That required another hefty procedure! To get this job done, I needed to pull out the handy-dandy DeWalt drill/driver! I used the screwdriver side to cut out the wax atop the lid to create a circle. Once I had an exposed circle on the lid, I could then drill a hole into the lid to begin the process. Ironically, the drill bits we have were not large enough for the pump to fit all the way through. So I used my next best thing; scissors!! By expanding the scissors a bit, I could establish a larger hole from my primed one. Insert the scissors, expand and twist the scissors so that the edges of the scissors build up a larger circle surface. I now had a large enough opening for the pump to fit through!
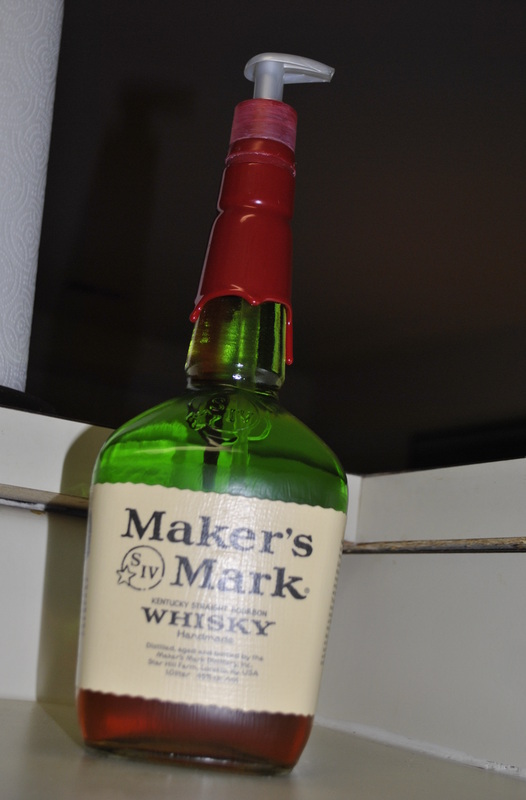
Now, I needed to secure the lid to the pump, so that it was stable! I was so eager to get this project complete, that while the topper was drying, I moved on to filling the bottle. We had about half a bottle of orange detergent and a whole bottle of green detergent. So I poured all the green in first and topped it off with orange. It created a nice appearance where the orange settled to the bottle and the green stayed on top. While you may think this was the end of the project...well, you'd be wrong. Because the ultra picky crafter that I am realized that the wrapping on the bottle was made of paper. And paper + water while doing dishes = disaster. And I could not have a disaster of this beautiful project. So, I pulled out my mod podge and mod podged the entire label to create not only a protective covering, but also a nice shine to the bottle. And again, just when you think we are complete...I decide there is still something left to do. As you'll notice, the top of the dispenser is while. I just dont see how that is going to look so cohesive. So I take a red sharpie marker that I have lying around, and sharpie that lid to pieces! As Josh is observing me Sharpie this top, he questions if it will just rub off with use. But I assured him I only did the base, which should not receive any direct contact with your hands as you pump out the soap.
So I'd like to present you with the final project! Enjoy! Now sit back, drink the rest of the liquor in your cabinet, and make crafts! Thanks for taking the ride! If you make something else, let me know! I'd love to see it!!
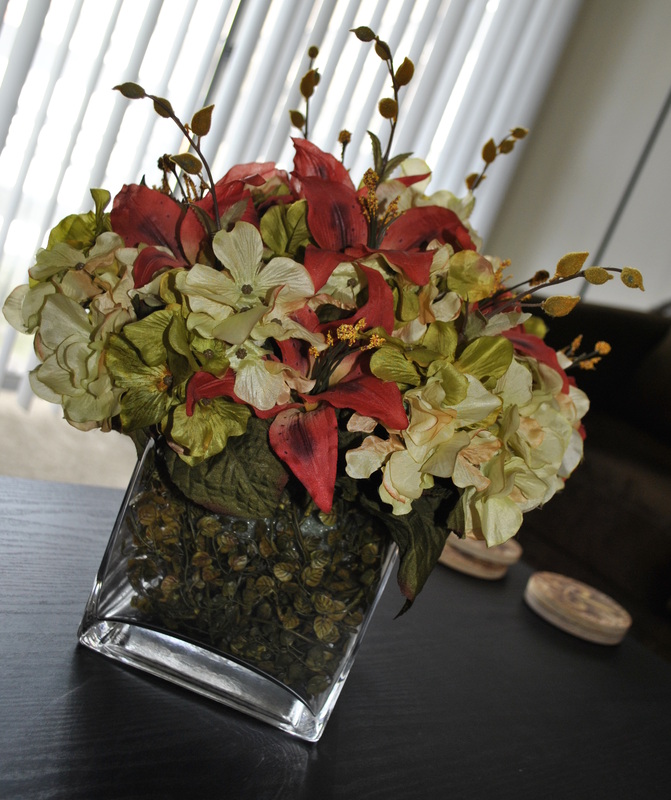
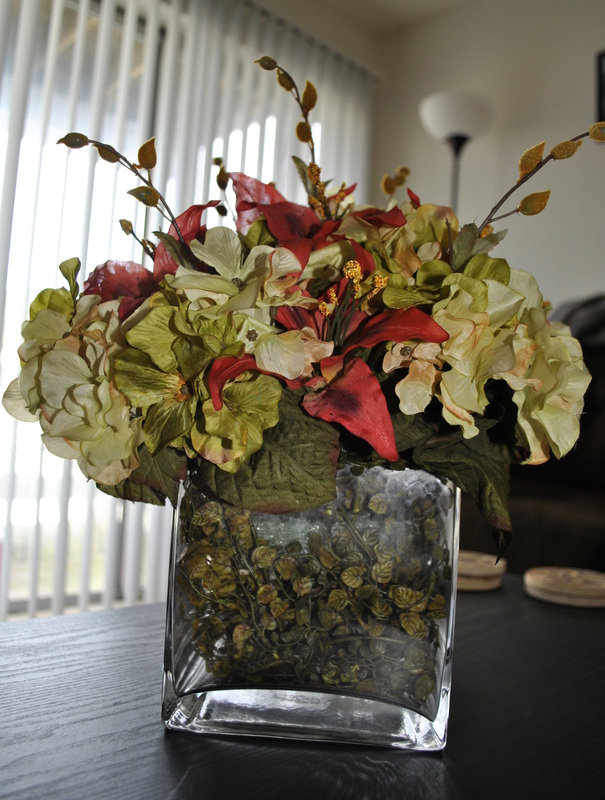
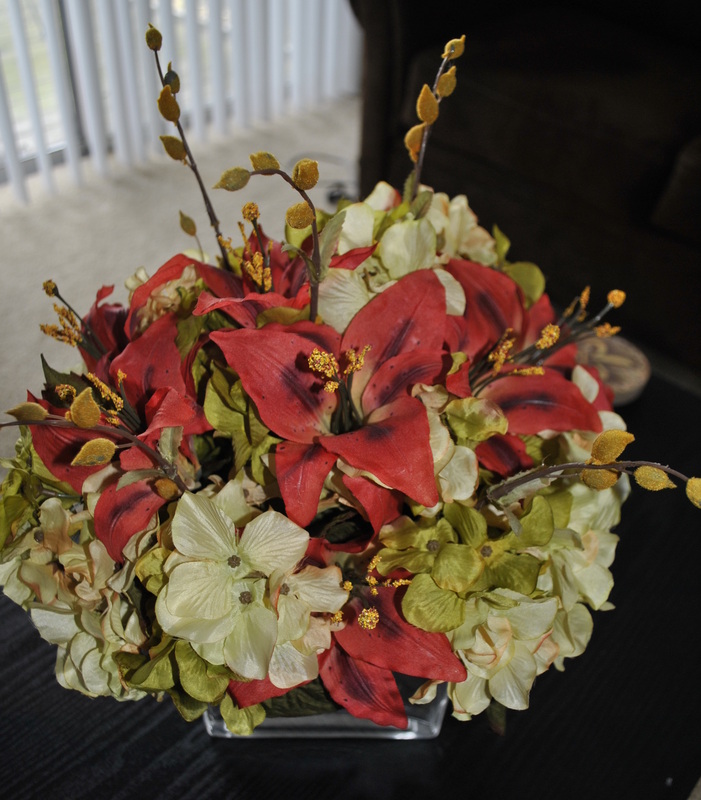
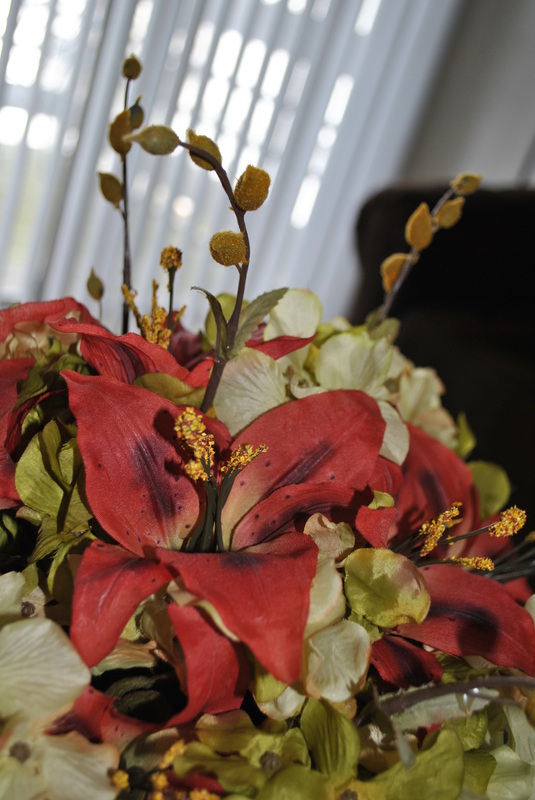
Well, my husband would have the answer to that one. Most likely, I will be found on the living room floor; working on a craft. It seems as if I have yet to become satisfied if I am just sitting around the house, lounging. Therefore, I am driven to stalk Pinterest or any other DIY site for goodies. One craft in particular, I completed prior to the discovery of Pinterest. My kitchen table and/or coffee table centerpiece (whichever table does not have food on it at the moment) was created from items I found at Garden Ridge. I went shopping for a purpose; to find flowers, moss and a glass container to create a one-of-a-kind centerpiece. This was my result: So that was pre-pinterest days. HA. As if I am referring to the dinosaur ages. But now I shall present my other Pinterest crafts. 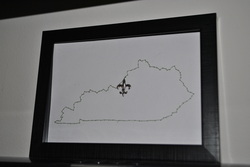 I began my experience with an embroidered outline of our home state of Kentucky with a Fleur-de-lis pin right in the heart of our home city - Louisville (and for those of you who are not from the 'ville, the fleur-de-lis is the symbol associated with Louisville, most likely due to the connection Louisville has with the French royal family and King Louis).
For this project, I googled an image of KY, saved it as an image and printed it in the size I wanted (4x6). Then taped the outline onto a piece of cardstock I had and used an embroidery needle to puncture holes along the state outline and punctured a hole where Louisville is on the map.
Then I used green thread (we love the color green) to "embroider" through the holes I had punctured. In order to get a solid line, you can either double back stitch or go around the outline x2. Then placed the Fleur-de-lis pin in Louisville, framed it up...and TA-DAH!
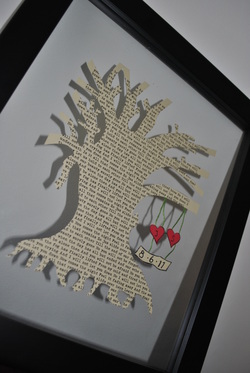 The next project was rather simple; A barren tree with imprinted words from our wedding song. Then two hearts with our individual initials and then a plaque with our wedding date on it. I say this was relatively simple, although I had to use a few steps. I first looked up the words to our wedding song, copied it into Word, and found a unique typewriter font to use ( Love Letters), and in order to make the whole page have words, I had to continue to copy and paste the lyrics until I had a full page. I used a light brown cardstock I had and printed out the song. To creat the hearts, I knew I was going to have a hard time free-handing it, so again, I found heart JPEG that I liked, put them into Word and formatted the hearts with our initials. Therefore, all I had to do was print out onto red cardstock and cut out the hearts. I free-handed the tree using a pencil and then cut out with scissors (duh - I know). From the scraps I had, I created a simple, yet whimsical plaque to cut out and used a sharpie to make the letters and outline look vintage. Using the same green thread from KY embroidered state above, I taped and attached all the pieces together! and, guess what...TA-DAH! I framed it in a floating frame that was provided to us as a wedding gift! :-)
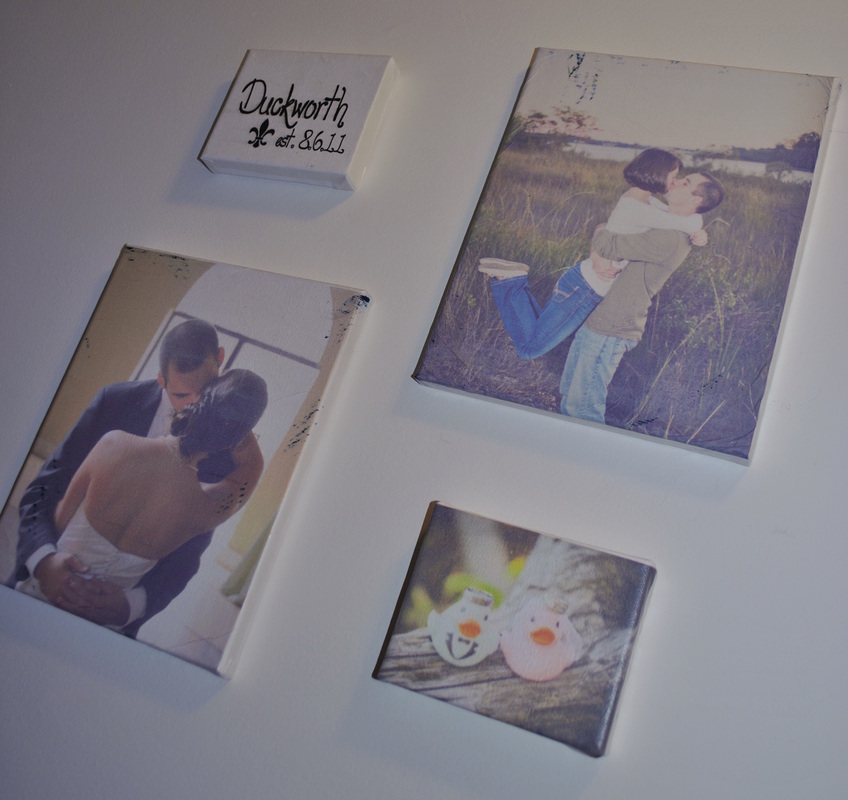
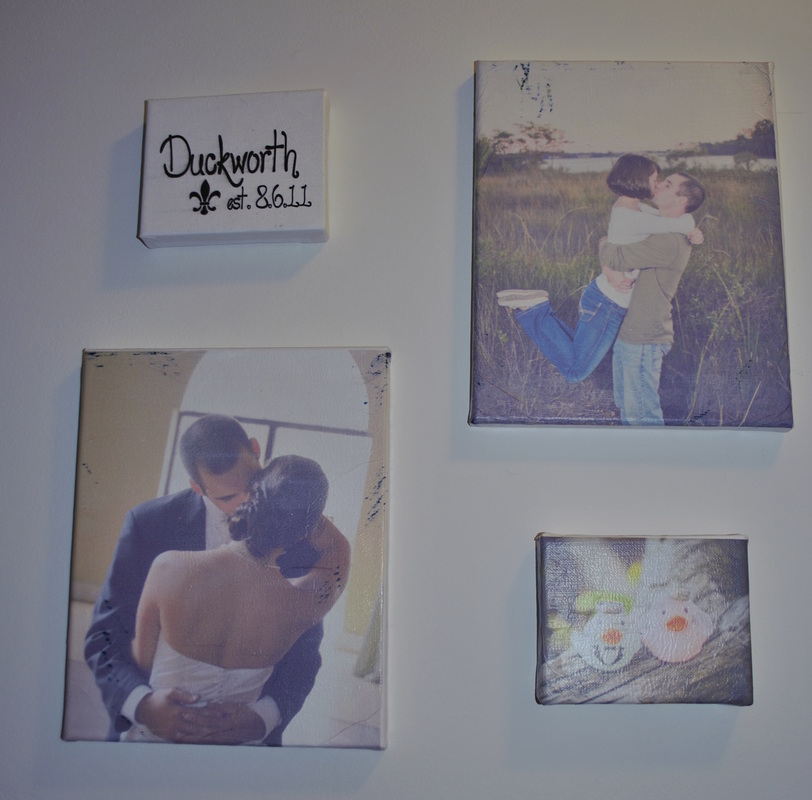
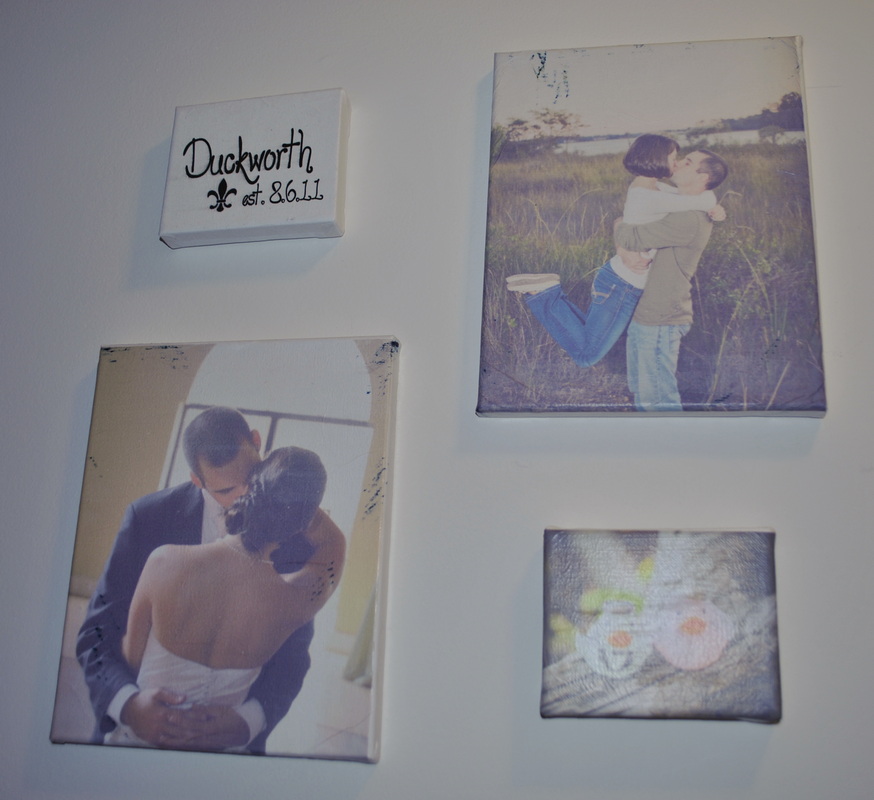
My next project did not go entirely as smooth as the others. I got the idea to print images onto tissue paper that is taped to regular printer paper. Using the images, mod podge them onto canvas for a final look. Well, easier said than done. I was having problems with getting excessive ink blots on the images. I tried even cleaning my printer, but was still having complications. Therfore, I went ahead and mod podged the images onto the canvas. The mod podge then enhanced some of the ink blots, but I went for it. We may be re-doing the images with a differen texture paper (but in the meantime, I went ahead and hung them on the wall ;-) ). So far, those are my bigger of projects (although my mind is alwasy running about what the next project will be!!). So hang in tight and who knows when you will see another project pop up!!
If you have some great projects going, I'd love to see and hear about them!
Thanks for sharing with me.
Hello, my name is Sarah, and I'm addicted to scrapbooking. But I dont get restricted to just a "book." I try to think outside of the book and go to more inspirational things. I dont do "artsy" types of projects, rather just very simple yet elegant items. Many people out there will do items with ribbons, buttons, etc (not to say that I dont at times...), but overall my pages are more about the pictures than about the additions. Although, this may be due to the fact that I have sooooo many photos and I essentially fill up a page JUST with pictures.
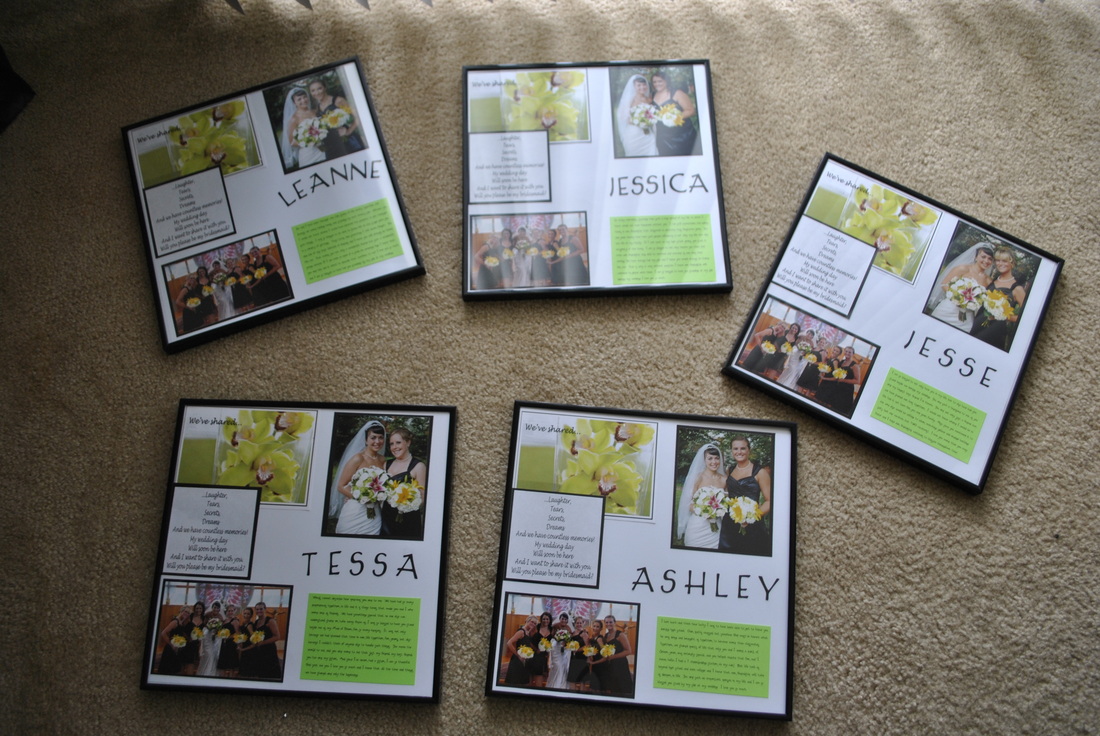
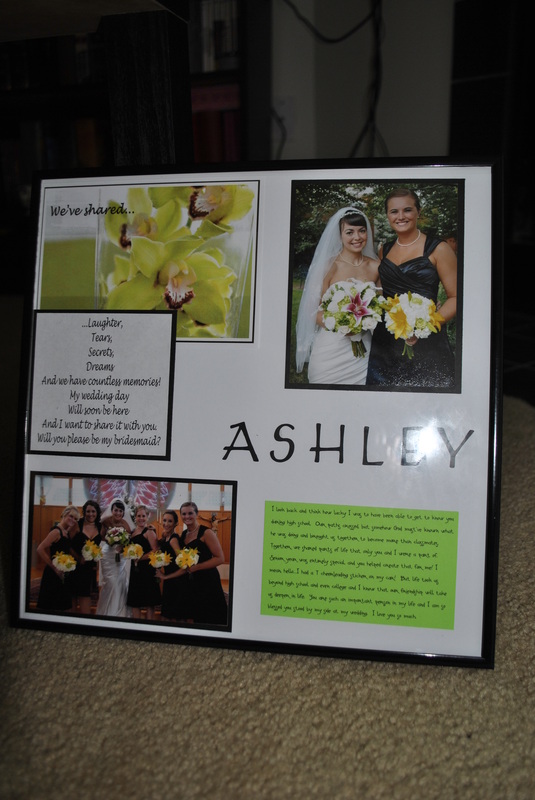
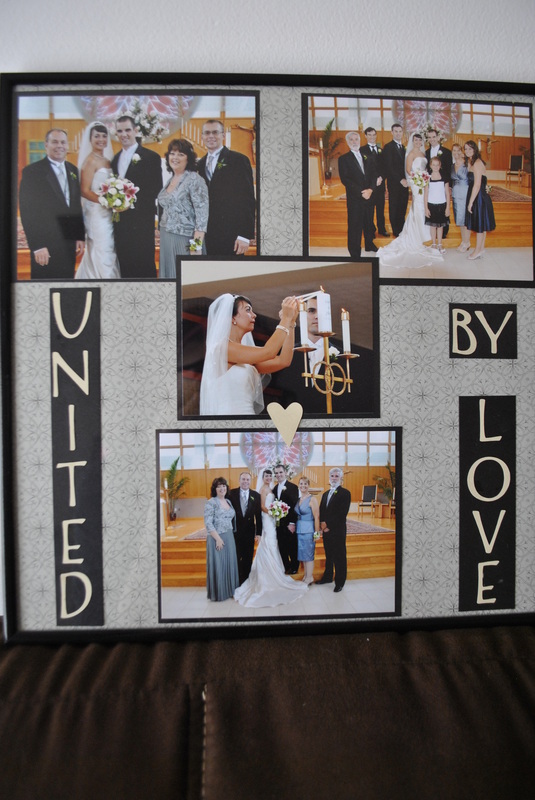
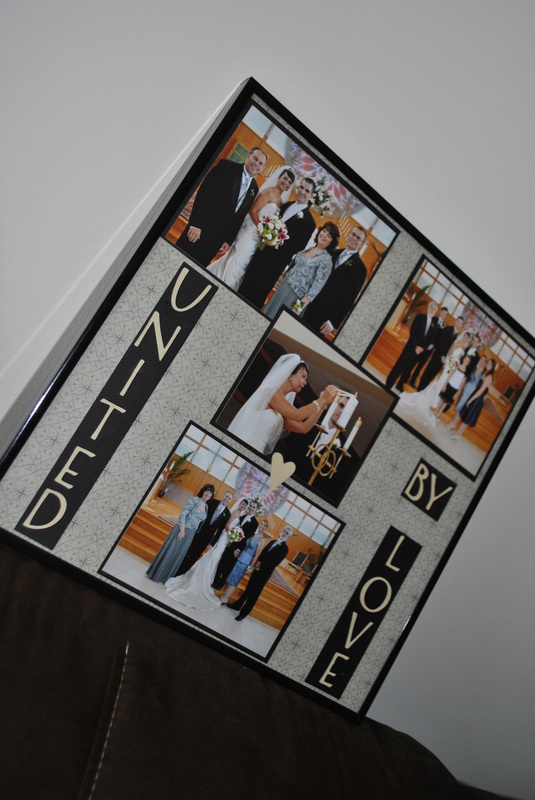
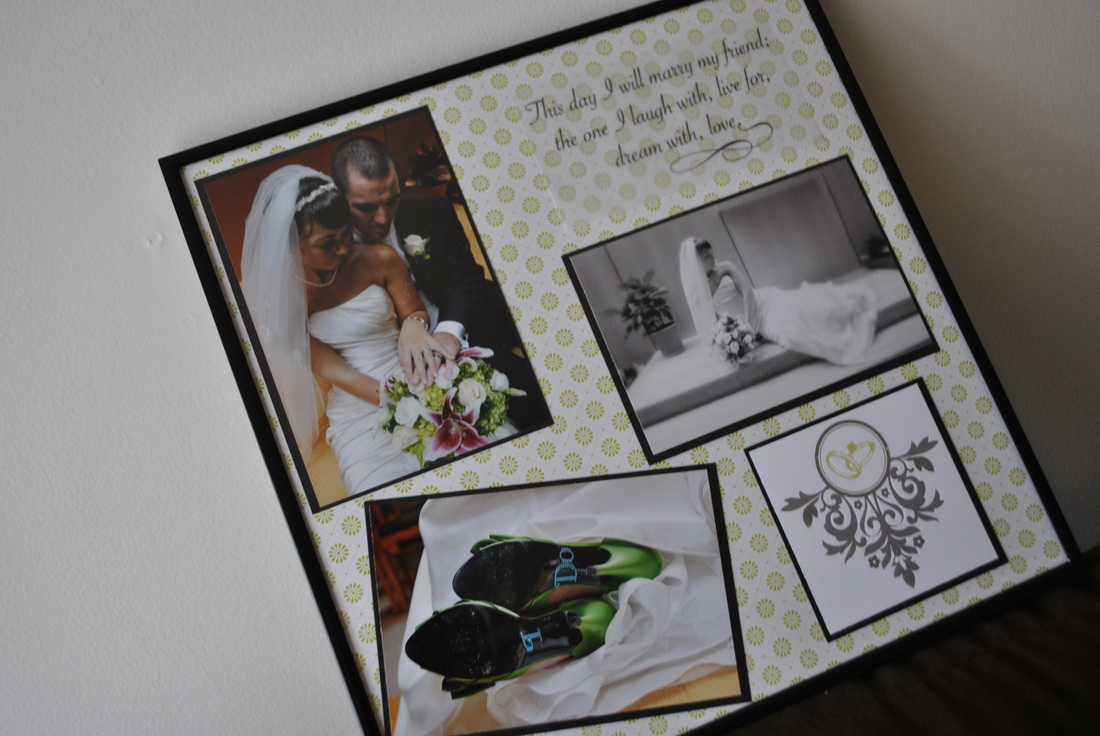
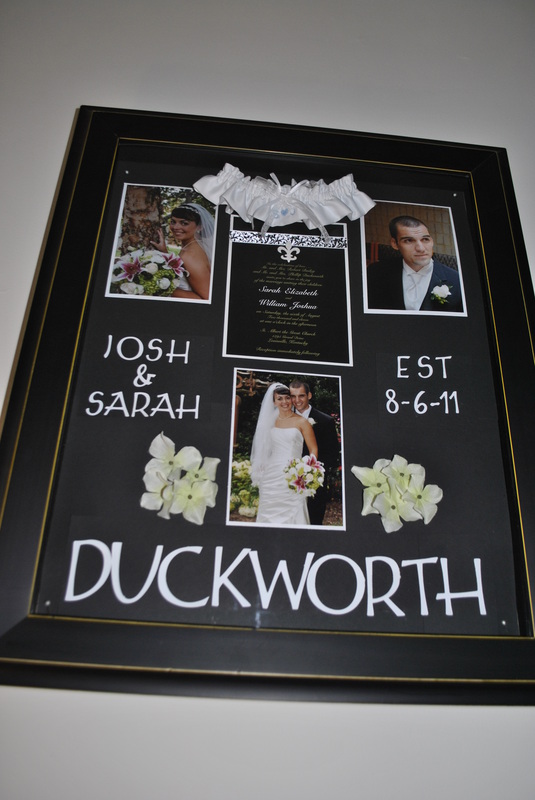
So I figured I would share some of my most recent scrapbooking crafts. As you will notice, they all have a common theme; Wedding. This is because I am currently working on our wedding scrapbook :-) and cannot wait for it to be complete (hopefully by the holidays!). I made these for my bridesmaids. They are 12x12 scrapbook pages placed inside 12x12 frames (LOVE these frames!) The top left images are copies from the invitation I sent my bridesmaids in the mail, requesting their presence beside me during the wedding. The bottom left image is of my bridesmaids and me prior to the ceremony with our flowers. The top right image is an individual of them and me prior to the ceremony. (the name should be self-explanatory) And the bottom right is a paragraph I wrote to each individual, thanking them for being my friend as well as being by my side during my wedding. I cannot wait to hand these out to the when I see them next!! I love my girls! I then created these two frame pages. The middle frame page includes photos of Josh and I together after ceremony, my "I DO" shoes and a photo of me. The other frame page includes each of us with our own family (top left and right), us lighting our unity candle, all leading into a photo of Josh and I with both sets of our parents. Essentially, a simple mathematical equation of two families united by love to create one family. This is a large shadowbox I created using indivdual photos of Josh and me on top corners, our wedding invitation between the two photos and my garter that I wore with embroidered "S ♥ J" . Below the invitation is a picture of the two of us following the ceremony. I then took some silk gardenias I had in my room, removed them from the stems, cut off the tips and glued them into a "bunch." And the letters should be self-explanatory. Our names, EST date and our last name now :-)
Hope you enjoyed looking at my projects and hope it inspires you!
|


 RSS Feed
