
So, shame, shame on me!!! It has been over 4 months since I was on here last. I am so embarassed! But, I have been very crazy, buzy working on pinning items to inspire me to decorate our NEW HOME!!! (ok, so, it's an apartment, but to us, its a HOME!). So, one of the items I wanted to start with was a menu board. I was incredibly inspired by a pin circulating around Pinterest and decided I would add a new spin to it! The original idea came from Once Upon a Chocolate Chip Pancake and I decided this was something that I COULD DO!
Some of the things I LOVED about this concept:
- it is made to be adjusted weekly, so it forces us to sit down and plan what we want to have for the upcoming week
- each card has the complete meal listed on the front and the back contains all the ingredients needed for the said recipe
- the box holds the remaining recipe items, so that we can continue to have a cycle of seemingless-ly unending meal plans
What I adjusted about OUR Menu board:
- I added a dry erase sticker so that we can add the items that we may not have in our pantry to the list as we prepare our weekly meal
- I took the concept of hanging the frame on the wall, and added Command strips with velcro so that we can easily take the menu board on or off the fridge to adjust/add/modify
- I added a few meal cards that suited our "lifestyle" to include "Cocktail nights" for Fridays and "write ins" for recipes that we find to easily add into the arsenal
- the original plan included using self laminating sheets, but I chose to go a different (and rather cost effective) route, using clear packing tape
What You Will Need:
- 11x14 frame
- scrapbook paper
- printer paper ( I chose 2 different colors)
- Avery dry erase sticker
- 7 clothespins
- packing tape
- Sharpie pen
- modge podge (I currently use pre-mixed podge)
- one 16-count crayon box to be used for the meal card container
- hot glue gun
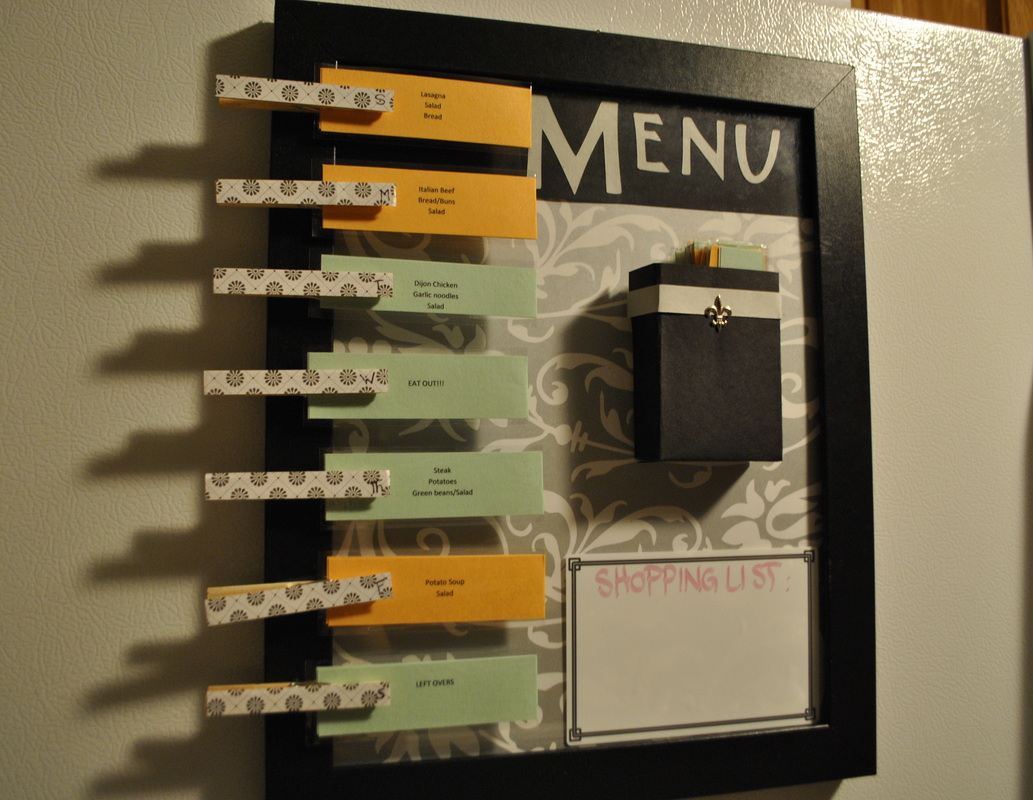
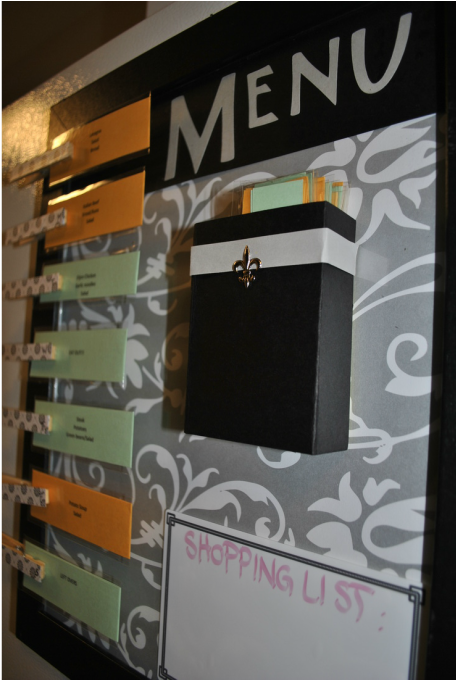
Menu Board Background: I took the 11x14 frame, and determined the scrapbook background paper I preferred and trimmed it up to the desired size. I wanted some contrast, so I used the black at the top as a top border. Using my handy-dandy-cricut machine, I cut the letters to create MENU in the contrasting color. I then pieced them together and paper glued them into place.
Menu Cards:
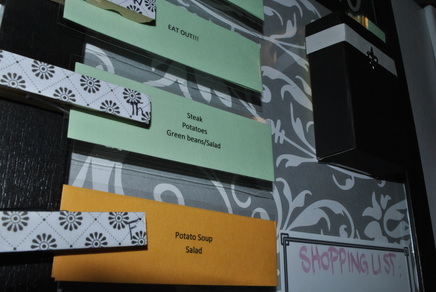
To create the menu cards, I started with a word document and formatted it into two columns. Then, hubby and I collaborated on approx 40 different entrees. From this, I added the side dishes (essentially each meal comes with - SALAD!). Then, from recipes I knew the ingredients for, I placed into the adjoining column all the food items needed to make said meal. For the meals we brainstormed about that I was unfamiliar with the complete ingredient list, I used PINTEREST and created an arsenal of word document recipes to suit our meal cards. So, when I was finished with the list, my finished product had the meal on the Left column and the ingredient list on the Right column. Printed them out, folded them in half, trimmed them up, and then used packing tape to "laminate" them so that each card now has a front and back. After "laminating" them, of course I had to re-trim them because I am no good at straight lines!!
To create the menu cards, I started with a word document and formatted it into two columns. Then, hubby and I collaborated on approx 40 different entrees. From this, I added the side dishes (essentially each meal comes with - SALAD!). Then, from recipes I knew the ingredients for, I placed into the adjoining column all the food items needed to make said meal. For the meals we brainstormed about that I was unfamiliar with the complete ingredient list, I used PINTEREST and created an arsenal of word document recipes to suit our meal cards. So, when I was finished with the list, my finished product had the meal on the Left column and the ingredient list on the Right column. Printed them out, folded them in half, trimmed them up, and then used packing tape to "laminate" them so that each card now has a front and back. After "laminating" them, of course I had to re-trim them because I am no good at straight lines!!
Clothespins: I searched through more of my scrapbooking paper to find a pattern that I enjoyed to work with the background look. I then traced the size of the clothespins x7 on the paper and trimmed out the skinny rectangles. Using my modge podge, I modge-podged the paper strips onto the tops of the clothespins and had to let them sit overnight to dry properly. I am always so amazed at modge podge, because when it is first placed onto the object it has a "glue-y white" look to it, questioning your outcome. But when you let the item sit, it becomes clear and all the original aspects of the item you used (MAGIC)! To indiate the days on the clothespins, I did not do anything fancy. I just wrote the first letter using a fine tip Sharpie pen. Using the hot glue gun, I glued the pins onto the edge of the frame (evenly spaced, of course).
Card Holder: Using a 16-count crayon box, remove the top folds so that the container is without a lid. Then, I sized up the paper to match the crayon box so that it wraps completely around from all sides and on the bottom. Using my paper tape, I secured the paper to the crayon box, and then secured that to the glass of the frame. For decorative purposes, I added another border and a small Fleur-de-lis to excite me ;-)
Dry Erase Sticker: Well, this one is the MOST self-explanatory, but I wanted to achieve the concept of having a place to be able to create a shopping list for food items we would need to complete our week of meals. I found these wonderful Avery dry erase stickers that came in a 4 pack with different color borders. For ease, I stuck with the black and white theme and stuck that right on the frame glass.
So, there it is!! Our new menu board!! I cannot wait to actually put it into use and get going!! For ease, I am willing to email the menu items as well as some of the recipes I created them from.
MEAL-ON!!!
MEAL-ON!!!
 RSS Feed
